Lightmaps
This section deals with working with lightmaps, both dynamic and static.
In my demo, I set up static lightmaps for each wall that don't change (unless I click on one and alter it by brightening a circular area, but this isn't practical in a game because it takes so long). In order to add in other light sources, I perform some offscreen rendering to blend the static lightmap with all the other lightsources, then modulate that with the wall texture and its decals. This serves most of my needs.
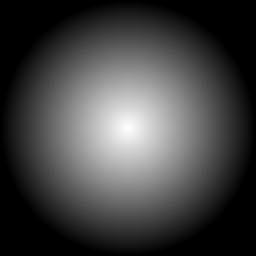
I ran into a problem, though, deciding what kind of dynamic lightmaps to use. For starters, I decided to use a linearly attentuating lightmap, which is a circular lightmap that starts at color 255 in the center and works its way to 0 as it gets farther from the center, like this:
It worked great, for the most part. I could set a radius for a spherical light source and figure out how far away I was from the surface to determine the size I should draw the lightmap along with an alpha modifier. But there were some inaccuracies.
Approximating accurate linear attentuation at any distance
Consider a light source of radius r, which is distance r/2 from a wall. And we want to look at the brightness of a point half way from the center of the drawn lightmap to its edge. The brightness of the very center of the lightmap is accurate, and so is the size of the lightmap drawn. Let's grind some numbers:
Drawn lightmap pixel: .5 brightness for being r/2 from the wall * .5 for being halfway from the center of the lightmap to the edge = final brightness .25
Actual needed brightness: A point r/2 from the center and halfway from the center of the lightmap should have the following brightness: World distance from center of light source = sqr((r/2)^2 + (r^2-(r/2)^2)/4) = sqr(7r/16), which requires a brightness of .3385, which is (1-sqr(7/16)); 0.25 is quite a ways off. As a result, most surfaces will appear darker than they should without some adjustment.
So here's what I did. I spliced the lightmap into 10 sections, working my way out from the center of the sphere, generating lightmaps as they would attenuate from the center in those circles. All the lightmaps still start at 255 and attenuate down to 0 at the edges, but the lightmaps not at the center of the sphere don't attenuate linearly. Then, when I figure out how far away the light source is from the surface I'm preparing, I use that to determine the two splices I'll want to blend together, and use the offset of the distance between the two to determine how I additively blend them together to the static lightmap. For example, if I'm at distance 0.51, I'll use 90% of splice 5 and 10% of splice 6 to get the final result.
Doing so, for a distance of, say, .55, for a pixel halfway from center, I get the following result:
Actual brightness needed: 0.3094
Approximated brightness blending two prepared spliced lightmaps: 50% (.2789 at .6) + 50% (.3385 at .5) = 0.3087.
A totally acceptable result.
Here are the 0-9 lightmaps if you'd like to use them, each representing a splice at 0, 0.1, 0.2, etc. up to 0.9. Have a ball. Note: They all start at 255 brightness in the center, so you'll still have to apply the distance alpha to darken them along with the splice blending alphas (just multiply them, it works). I even made sure all the centers are exactly 255 and the edges are 0. I verified by sampling some pixels in an image editor, and they appear to be very close to the correct values, considering truncations to a byte value.
Multiple linear lightmaps illuminating one area
There was another problem I had, and it was more a matter of perception. If I had two light sources close to each other, they lit up things pretty intensely (two light sources that individually lit up a dark wall at 50% would entirely illuminate it together, since 50% + 50% = 100%), which wasn't really what I was looking for. So I figured I would try another method of additive blending. Instead of just adding the spliced lightmaps to the static lightmap, I would use a source blend factor of 1 - Destination color. This would allow full intensity lights to illuminate the scene entirely, but lesser intensity lights would then only tend towards full illumination without entirely getting there (Two 50% lights would now illuminate to 75%, but a 100% and 50% would still reach 100%). Unfortunately, I was already using a source blend factor of Alpha, so I would have to prepare a second offscreen buffer, combine each pair of spliced lightmaps there using source Alpha, then blend that combo with the static lightmap using 1 - Destination color. So, more rendering will be necessary, since there is no supported "Source alpha times One minus Destination Color" source factor in the blend function.
Alternatively, I can take advantage of the multitexturing pipeline, combining the two spliced lightmaps with their corresponding alphas in the texture pipeline and using the One minus Destination factor in the blend function outside the pipeline, and get the result with a single render. Very worth doing. Instead of applying an alpha to darken the textures, I could use the color portion of the vertices to affect the brightness of the result (which would work since the splices are white-based, allowing me to combine intensity of the light source itself along with the reduction because of distance), and use the vertex alpha to guide the blending of the two splices so they combine correctly.
There was a concern that a 40% light plus a 20% light would provide a different result than a 20% light followed by a 40% light. But I wrote out the end formula that the destination color would take on, and the order didn't matter. The result was the same. One lightmap of color C1 would result in D + (1-D) * C1. Substituting that result as D into the same formula for the second result, two lightmaps (C1 and C2) applied one after the other would result in D + (1-D) * C1 + (1 - (D + (1-D) * C1)) * C2, which expands to D + C1 - C1*D + C2 - C2*D - C1*C2 + C1*C2*D. Condensing further, we get D + (C1+C2)*(1-D) - (C1*C2)*(1-D), which provides the same result no matter which order you apply C1 or C2. The same, I assume, would be true for any more that you add.
This lighting method should provide a way to set up multiple light sources that didn't so dramatically illuminate an area when combined.
The end result, after testing it, provided a more gradual increase in the surrounding light with multiple light sources, without compromising their ability to illuminate. I'm happy with the result.
After some experimentation and convering over to C++, I'm realizing that switching to an offscreen buffer is expensive. The frame rate drops considerably. I imagine the best way to handle this is to allocate large texture for lightmaps, and use one for multiple surfaces. Perform one switch and prepare the light map with the light sources, and the texture is ready. My current designs assume one surface to each lightmap, and even though my simple maps have a decent framerate, they could easily suffer.
At first I thought this solution would do well for complex arrangements of surfaces, such as a mesh or a wall with an arch in it. But that was under the assumption that the entire cluster of surface could use the same lightmap for its lighting. But there is another application that takes it one step further. If the offscreen surface is large, it could be populated with the proper light data for all the surfaces it serves, no matter their orientation, and then render all the surfaces using that texture. That way, the lightmap for an entire cluster of surfaces could be prepared, and then the surfaces rendered using only the single buffer switch. This would significantly reduce the buffer switching, but would require special attention to allocating space on the render buffer for the surfaces.
I've since managed to implement this solution, and even though the framerate increase wasn't dramatic (about 70% faster, but still drops sharply compared to all static lighting), it's definitely worth keeping.
Another way to blend two lightmaps
It may be possible to put all the lightmap splices into a 3D texture, and use the third coordinate to cause an automatically blending of the two stages. This idea came from Game Programming Gems 2. If it will speed up rendering, I may consider using it.